This is default featured slide 1 title

Go to Blogger edit html and find these sentences.Now replace these sentences with your own descriptions.This theme is Bloggerized by Lasantha Bandara - Premiumbloggertemplates.com.

This is default featured slide 2 title

Go to Blogger edit html and find these sentences.Now replace these sentences with your own descriptions.This theme is Bloggerized by Lasantha Bandara - Premiumbloggertemplates.com.

This is default featured slide 3 title

Go to Blogger edit html and find these sentences.Now replace these sentences with your own descriptions.This theme is Bloggerized by Lasantha Bandara - Premiumbloggertemplates.com.

This is default featured slide 4 title

Go to Blogger edit html and find these sentences.Now replace these sentences with your own descriptions.This theme is Bloggerized by Lasantha Bandara - Premiumbloggertemplates.com.

This is default featured slide 5 title

Go to Blogger edit html and find these sentences.Now replace these sentences with your own descriptions.This theme is Bloggerized by Lasantha Bandara - Premiumbloggertemplates.com.

Mostrando las entradas con la etiqueta Workout. Mostrar todas las entradas

lunes, 20 de febrero de 2017

ABS EXERCISES & WORKOUTS


Abs

We all want great abs! Abdominals have come to be the center piece of the physique, a real show piece. Both men and women have 'great abs' or '6-pack' on their goal lists. Nothing is more appealing than a healthy and fit body with a nicely trimmed waist. The important key for anybody to realize is that everyone has abdominals, they are simply covered in fat and need toning. Now, I must point out that you cannot spot reduce fat from your abdominal region; when you lose fat, it is lost equally throughout your entire body. However, you can encourage this fat loss process by exercising the abdominals regularly. It is essential to take into consideration that to have a complete abdominal development, you must train all the four areas of the abdominal region equally. The hardest area to see progress in are the lower abdominals, but this is only due to the fact that more fat is stored there than in the other areas.


Anatomy and Benefits

The abdomen, or abdominal region is actually composed of 6 muscle groups that are located and attached from the ribs to the pelvis region. These are referred to as the core region and are responsible for moving, flexing and supporting the trunk areas. Amongst the benefit of having a slim torso, having strong abdominal and core muscles reduces lower back pain an aches and increases stability to your torso.


Exercise Basics

The abdominals are a stubborn muscle to train; moreover, due to the quick build up of lactic acid (burning feeling) during the exercises, most people avoid training them. It will be noted that all areas of the abdominal area must be trained to achieve fully developed the abs. The upper abs, lower abs, and middle abs along with the obliques must all be trained with various exercises. You do not need to train all four areas every single abdominal training session; however do not favor one area to another unless it is and area which is under developed. The proper way to train abdominals is with slow repetitions along with a controlled, strict range of motion. A true set of abdominals should only be between 12 to 15 repetitions, unless you are advanced and perform up to 20. If you are past this repetition range of 20, you are not training your abdominals effectively.You will notice this with individuals performing abdominal exercises of repetitions ranging from 50 and above; secondary muscles are applied. Abdominals recover quickly, so they may be trained every other day, perhaps every day by advanced individuals. Breathing air in and blowing it out is very important to the contraction and stretching of the abdominals during the exercises. As you contract your abdominal muscles, you need to blow out your air and contract, then when you release and stretch out, you need to breath air in. Performing this correctly will lead to results!
OPEN THE NAME OF EACH EXERCISE

ABS EXERCISES

ABDOMINAL AIR BIKE
ABDOMINAL BARBELL ROLLOUTS
ABDOMINAL PENDULUM
BARBELL SIDE BENDS
BENCH JACK KNIFE
CABLE CRUNCH
CHAIR LEG RAISE
DECLINE ABDOMINAL REACH
DECLINE SIT UP
DECLINE WEIGHTED TWIST
DUMBBELL SIDE BENDS
FLOOR CRUNCH
HANGING KNEE RAISE
LOW WOOD CHOP
LYING BENCH LEG RAISE
LYING CABLE CRUNCH
LYING CABLE KNEE RAISE
LYING FLOOR LEG RAISE
PLANK
SEATED LEG TUCKS
STANDING OBLIQUE CABLE CRUNCH
TWISTING CABLE CRUNCH
WEIGHTED CHAIR KNEE RAISE

domingo, 4 de diciembre de 2016

TOP 5 SHOULDER TRAINING MISTAKES

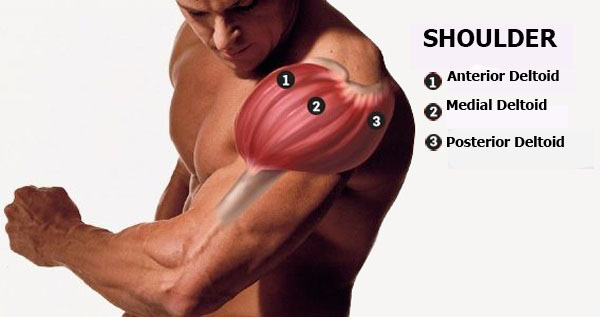
#1: Overemphasising Front Delts

All delt heads do not work equally, and the one that typically carries the heaviest load is the anterior. Your front delts are not only primary movers during overhead presses, they’re also secondary movers during chest and triceps workouts, helping during presses and dips. If you’re doing front raises in addition to a lot of shoulder, chest and tri compound lifts, you’re likely overworking your front delts.

"This is especially true if you train chest and shoulders in the same workout or on consecutive days."

Solutions:
  • If you hit chest before shoulders in the same workout, consider how much pressing and dipping you’ve already done before working delts. If the total is at least eight sets, do no more than four sets total of shoulder presses and front raises.
  • Don’t train chest and shoulders on consecutive days. Ideally, three days should pass between hitting each, so if you do chest on Monday, do delts on Thursday.
  • Dumbbell presses or presses behind the neck stress the middle delts more and front delts less, so these are good alternatives to military presses if you believe that your front delts are overtrained or that they’re outgrowing the other heads.
  • One cardinal rule of bodybuilding is that you can never be too wide. And so, it’s generally best to emphasize your middle delts more and front delts less on shoulder day, because the middles (most responsible for shoulder width) get little stress during other workouts and your fronts may assist during both your chest and tri sessions.
#2: Underemphasising Rear Delts

Just as anterior delts tend to get too much emphasis, posterior delts tend to get too little. Rear delts assist during lat exercises, such as rows and pulldowns; but if you’re targeting your lats correctly, it’s unlikely that your rear delts are receiving enough work on back or shoulder day to reach their full potential.

"Most bodybuilders relegate rear laterals to last place in their shoulder routines, and then go through the paces for four sets of minimal intensity. It’s no wonder posterior delts are so frequently your shoulders’ weakest links."

Solutions:
  • Consider training rear delts on back day, when you can emphasize them separately from their front and middle brothers. Perform four to six sets of rear laterals at the end of your back workout.
  • If you choose to train posteriors on shoulder day, don’t always perform them last in your routine.
"Instead, do rear laterals after presses – but before any side laterals or front raises – or switch up the order from workout to workout."

#3: Too Fast And Furious

Especially when it comes to side laterals and front raises, trainers tend to go too heavy and use too much momentum. Each delt head is relatively small, and to isolate them, you need to minimise both momentum and assistance from other muscles. You may not want to be seen holding 20-pound dumbbells, but if that’s what it takes to best isolate your medial delts, then those are the weights you should be grabbing.

Solutions:
  • Do shoulder exercises seated instead of standing to remove your legs from the lifts.
  • Choose weights that you can utilize for 8-12 strict reps at a relatively slow pace (1 second up, 2 seconds down). Pause at the bottom of reps to begin each rep from a dead stop and eliminate any swinging momentum.
#4: Improper Form

This mistake usually runs in concert with #3. The main culprit is emphasising the weight and not focusing on muscle stimulation. Thus, the weight is raised by any means necessary. Other times, trainers simply develop bad habits; some never learn how to do lifts in the manner that best stimulates muscle gains.

Solutions:

"Correct form is especially important on shoulder day, because of the ball-and-socket joints’ vulnerability to injury."
  • When doing side laterals, let your elbows lead the way and raise them until they’re even with your shoulders. In the top position, your hands should be just below the level of your elbows (arms slightly bent) with your pinkies up and thumbs down.
  • Throughout each set, focus on the deltoid heads you’re targeting, not on the resistance. Work the muscle, not the weight. After reaching failure in a shoulder exercise, don’t cheat to eke out extra reps. Instead, do a drop set, have a partner help with forced, reps or use the rest-pause technique.
"When doing overhead presses, lower your hands to approximately chin level (or below) and raise to just short of lockout."

#5: Lack Of Exercise Variety

Shoulders may be the only body part you train with just free weights. It’s true that barbells and dumbbells are the most effective training tools, but you can too easily fall into a rut of doing the same three or four free-weight exercises the same way, workout after workout. Variety is also an effective tool.

Solutions:

"There are a lot of ways to do overhead presses."

Try including a different pressing exercise each shoulder workout. Here are three free-weight presses you likely aren’t doing: underhand presses (press a barbell over-head with a shoulder-width underhand grip); Arnold presses (press dumbbells from underhand at the bottom to overhand at the top); and rack military presses (press each rep from a dead stop off of power-rack supports set at chin level).
  • There’s more to training middle delts than just dumbbell side laterals. On occasion, do side laterals with cables or a machine and, regardless of equipment, you can go unilateral. Wide-grip upright rows are another way of targeting your middle delts.
  • Likewise, you can perform rear laterals with cables or machines and go unilateral. You can also do wide-grip bent-over rows to focus more on your posterior delts. A Smith machine is an effective tool for wide-grip rows; hold each contraction and flex your rear delts.
Lessons Learnt:

  • Work your front delts less and middle delts more
  • Train rear delts after back or don’t leave them for last in your shoulder routine
  • Sit down and slow down to remove momentum from lifts
  • Use strict form and avoid cheating, even if only to extend a set beyond failure
  • Do a wide variety of shoulder exercises

viernes, 25 de noviembre de 2016

THE TOP 9 DUMBBELL EXERCISES FOR BUILDING MUSCLE MASS

There are few tools as effective as dumbbells for packing on slabs of muscle.

The key to gaining muscle mass is to emphasize training movements before muscles.  When you train with dumbbells you are not only creating a stimulus that produces muscle mass, but also creating functional strength because of the added need to stabilize the weight in multiple planes of movement.

So what are the best dumbbell exercises for mass? Here are my top nine of the best dumbbell movements for packing on muscle and developing usable strength.

1. CLEAN AND PRESS

There are few muscles that this movement doesn’t include.  You can perform it with one dumbbell or two based on your skill and strength levels. Perform them at the beginning of your workout with heavy weight after a proper warm up for 3-5 sets of 5-8 reps for a total of 25 or so reps to build a monstrous upper body. You can also perform them for higher reps as a finisher, but be warned, this is not for the faint of heart. Try performing 3 sets of 15-20 reps at the end of a workout. As a bonus you will get a little cardio workout too.
Perform it by starting with the dumbbells at your sides and then use your hips to generate some momentum (like you would with a cheat curl) and then clean the dumbbells up to your shoulders.  From the shoulders, ensure that your forearms are vertical and press the dumbbells overhead.

2. ARNOLD PRESS

When it comes to building massive shoulders, no one can argue with the Austrian Oak’s methods. The Arnold Press is great for building massive shoulders because it extends the range of motion of a conventional shoulder press. It also involves the posterior shoulder when you sweep the dumbbells from in front of your body out to the sides. Replace the traditional dumbbell press with the Arnold Press for at least four weeks to bring about new growth. Try alternating heavy days (3x6-8) with volume days (4x12-15).
To perform the Arnold press, start with the dumbbells in front of your shoulders with your palms facing your chest. Next, simultaneously sweep your elbows out to the sides while pressing the dumbbells overhead. Follow the same path on the way down.


3. ALTERNATING DB BENCH PRESS

In order to stimulate muscle hypertrophy it is necessary to increase the time under tension - the amount of time that a set lasts for an exercise. When you perform a Dumbbell Bench Press while alternating which arm is performing work you increase your time under tension and provide more of a stimulus for growth. As an added bonus you get a great core workout from having to resist trunk rotation while working one side at a time.

Place this exercise early in a workout while you are fresh. It is a skill intensive exercise and you need to be mindful while you are holding one dumbbell at lockout while the other is performing a repetition. Start with 3 sets of 8 to get a feel for how long a set is going to take you.
Perform this version of the bench press by starting with both dumbbells at lockout and then alternate which arm is performing a repetition and which one is at lockout.


4. SUMO DEADLIFT WITH DUMBELL

The sumo deadlift is a strength training exercise that works nearly every major muscle group in your body including buttocks, hamstrings, thighs and lower back. 
Its effectiveness to target multiple muscle groups at once got many fitness experts calling this exercise as the king of all exercises. 
How to Sumo Deadlift with Dumbbell:
  1. Stand with your feet very wide, wider than shoulder width apart with a dumbbell in the middle of your feet. Make sure your toes point outwards. Bend at the hips to grab one end of a dumbbell with both hands, arms hanging in front of you.  
  2. Tighten your abs and lift the dumbbell by straightening your legs and standing up straight. 
  3. Keeping your chest and head up, lower your hips until the dumbbell passes through the knees. Make sure to keep your weight on the heels and bend through your hips and knees. 
  4. Repeat to complete 10-12 repetitions for 2-3 sets.

5. REAR FOOT ELEVATED SPLIT SQUAT

Don’t think you can build great legs without a barbell? I beg to differ. The Rear Foot Elevated Split Squat (RFESS) allows for you to load your legs with unbelievably larger loads than if you were performing a traditional back squat (provided you have the grip strength to hold 100 plus pound dumbbells in each hand).

The RFESS takes advantage of what well known and respected strength coach Mike Boyle calls the Bilateral Deficit. The bilateral deficit states that you are stronger on one leg than on two. In fact, most individuals will be able to perform well over half of their 1RM back squat with one leg. So if my back squat is 300 lbs and I were to grab 75lb dumbbells in each hand (total of 150 lbs), I will be able to perform multiple reps on one leg when the load on one leg is technically the same as my 1RM back squat!
Take advantage of the bilateral deficit and train your legs one at a time with heavier loads than you would have used with a barbell. Start with 3 sets of 10 and go from there. 
To perform the rear foot elevated split squat grab a heavy set of dumbbells and place one of your legs back on a bench. Next, ensure that your front foot is in a position where your knee will not travel past your toes when you start to descend into the bottom of your squat.
Your rear knee may or may not touch the ground depending on how tall you are. On the way up drive through your heel and try to stay as upright as possible. I would also recommend placing an Ab-mat or foam pad on the ground where your rear knee touches to give you a little cushioning and to adjust your range of motion if you are shorter or using a taller bench.

6. THREE POINT BENT-OVER ROW

There is no exercise like the row for getting a thick, dense back. The 3 point row allows for you to train heavy with a dumbbell. This position takes the stress off your lower back because you are bracing the bench with your non-working arm to keep you back angle consistent throughout the set.

My favorite way to perform dumbbell rows is to run the rack after you have worked up to a heavy set of 5. Use straps if your grip is failing, but be sure that you are still paying attention to training your grip as it is often overlooked and can cause heartache later on in your strength training career.
Stand in a staggered stance - if you are working the right arm, the right foot should be back. Next brace your opposite hand on a bench and ensure that you have a solid and flat back. Start with the dumbbell on the floor and pull it to your pocket, not towards your armpit.

7. RENEGADE ROW

There are few exercises that will challenge your core and back like the Renegade Row. I walk away humbled every time I perform it. I like to perform these on back day after I have performed weighted chins or pull-ups. Do 2-3 sets of 8-10 reps after a heavy pulling exercise, preferably a vertical pull like lat-pulldowns, weighted chins, or weighted pull-ups.
To perform the movement you begin in a modified push up position with your feet spread more widely than a push up (about shoulder width apart) and your hands placed under your chest inside your shoulders. With a pair of dumbbells in your hands, maintain the front lean and rest position while you alternate which arm performs a row and which arm keeps you from falling on your face!
Keep your abs and glutes braced the entire time and don’t allow your butt to shoot up or sag too low and keep your hips level the entire set. The only part of your body that should be moving is the arm performing the row.

8. DUMBELL BICEP CURL

The dumbbell bicep curl uses both arms at the same time to build stronger arms.

Steps :

1.) Start off standing up straight with your feet shoulder-width apart, abs tight, knees slightly bent and a dumbbell in each hand holding in a palms up grip.

2.) While holding the dumbbells extend your arms at the side of your body, then slowly lift your arms up towards your chest until your forearms touch your biceps.

3.) Isolate the bicep and hold this position for a count.

4.) Return back to the starting position and repeat for as many reps and sets as desired.

Tips :

1.) Refrain from swinging your arms during this exercise.


9. STRAIGHT ARM SIT UP

To build a stand-out six pack, you need to build the rectus abdomis. In order to increase the muscle size on your abs, you need to train them like you would any other muscle: by using progressively heavier weights. If the muscle bellies on your abs are small then you must get your abs bigger by training them with weight. I like the straight arm sit up to load your abs and bring about growth. 3 sets of 15 with a weight that you can manage is perfect for ab development.
In the starting position (back on the ground with knees at 90 degrees with feet flat on the floor) press a heavy dumbbell towards the ceiling. Next, perform your sit up keeping your arms straight and making sure that the dumbbell is still pointing towards the ceiling. Slowly return to the starting position, always ensuring you are keeping the weight aimed at the ceiling with the arms locked out.

sábado, 15 de octubre de 2016

TOP 5 CHEST-TRAINING MISTAKES


#1 Overreliance on barbell bench presses

“How much can you bench?” The question is asked so often of anyone with a modicum of muscle that it’s long been the ultimate gym cliche. Still, the fact that the bench press is the go-to strength barometer has had a decimating effect on chests. Bodybuilders bench too much too often for too many sets of too few reps. Used correctly, the bench press is an excellent exercise. Overused, it can potentially overdevelop the lower-pec region in relation to the upper region, giving you “droopy boobs” (think Art Atwood). Furthermore, consistently benching for maximum sets of low reps will boost your chances of injuries, ranging from shoulder, elbow and wrist strains to pec tears.

Solutions:

  • Think of barbell bench presses as just another chest exercise, one that can be done at any time during your routine, including last.
  • Do sets of eight to 12 reps, only occasionally pyramiding to as low as six reps.
  • If you’re curious about how much you can bench for a single rep, use an online calculator and your best 10-rep set to compute your one-rep max.
  • If you always do barbell benches first, start with incline presses–with barbells one workout and dumbbells the next. Alternately, cycle eight-week periods during which you do no free-weight benches with eight weeks during which you do benches with barbells one workout and dumbbells the next.


#2 Under training upper chest

Often occurring in concert with an overreliance on bench presses is an underreliance on exercises that target the upper-pec region. This is the area from your clavicles to approximately halfway down your chest. It gives your torso a higher appearance and visually ties your pecs in with your delts and traps (think Franco Columbu). Pecs are naturally thinner at the top than the bottom, so everyone can prioritize their upper pecs via incline work without fearing that this region will overpower their lower pecs.

Solutions:

  • Do incline presses with a barbell or dumbbells first in your routine.
  • In each chest workout, include at least as many sets of upper-chest work (incline presses and flyes) as you do lower chest work (flat and decline presses and flyes, and dips).
  • To focus cable crossovers on your upper chest, perform them with the cables set near the floor, so that you are pulling the handles up and together on each rep.
  • Practice posing your upper pecs with hands-on-hips most-musculars or simply tensing. This will build a greater mind-muscle connection, so you can feel this area contracting on targeted chest exercises.

#3 Overreliance on machines

While too many bodybuilders do too many sets of benches, there is another group that goes to the other extreme–they rarely grab barbells or dumbbells on chest day. Most modern gyms have a plethora of press and flye machines, but resist the urge to form the bulk of your routine around mechanical movements. Despite modern advantages, the best chests of Arnold’s era still compare favorably with the pecs in recent Olympia pose-downs. Why? Then, pecs were worked almost exclusively with free weights.

Solutions:

  • Do mostly free-weight and body-weight basics.
  • Do no more than half of your chest exercises with machines.
  • If you do mechanical presses, try to choose a unilateral Hammer Strength, FreeMotion or similar machine that approximates the freedom of free weights.
  • If you’re not strong enough to get eight bodyweight reps while dipping, use a dip assist machine to lighten your load. (This doesn’t count as a machine exercise.)

#4 Failure to contract

The downside of free weights is that they make it difficult to attain a maximum contraction in the pecs. When you do dumbbell flyes, there is less resistance on the chest at the top of the movement (when the dumbbells come together) than near the bottom. Likewise, during presses or dips, the triceps do much of the work near lockout.

Solutions:

  • Do one flye exercise each workout with either a machine or training bands. If you do cable crossovers, cross one hand over the other (hence the name) at contractions. Similarly, if you use an upright flye or pecdeck machine, or do flyes with bands, perform repetitions unilaterally in order to bring your hand past the center plane of your body to lengthen contractions.
  • Lock out on presses. Although your triceps will do much of the work at the end, you can still maximally flex your chest at contractions.


#5 Working the weight, not the muscles

“Work the muscles, not the weight” is one of Jay Cutler’s favorite aphorisms. Working the weight is different than focusing too much on the number of pounds used, and thus going too heavy. ''Working the weight is using speed and momentum to pound out reps with little or no regard for the targeted area and it’s a precise distillation of the way many bodybuilders press, flye and dip.''

Solutions:

  • Feel where you want to focus each set before it begins. For example, tense your upper chest before a set of incline presses to keep your attention on that area.
  • Always utilize strict form. This is not only safer, but also better for targeting your pecs, because the sloppier your execution on a chest exercise is, the more that secondary muscles take over.
  • Carefully control the negative halves of reps. During presses, take approximately two seconds to lower the weight and one to two seconds to raise it.

Lessons Learned:

  • Treat bench presses as just another chest exercise with reps in the eight to 12 range.
  • Prioritize your upper chest.
  • Do primarily free-weight presses and flyes.
  • Concentrate on the contraction of each rep.
  • Keep the focus on your pecs, not on the weight.

AUTHOR: Greg Merritt

domingo, 8 de mayo de 2016

HOW TO TRAIN YOUR CHEST/PECS FOR MAXIMUM GROWTH


The key to training each of your muscles is to understand their function and how they work. Your chest is no different. Here, we’ll go over your pectoral muscles, how to train them, and we’ll even dispel a few myths along the way.
Chest Anatomy:

The pectorals are your chest muscles. They begin at your sternum and connect to a tendon that attaches to the humeris bone in your upper arm. Each time your chest muscles contract, they essentially pull your upper arm bone forward and in front of you.

To get a feel for the full range of motion of your chest muscles, straighten your arms out to each side of you. Move your arms forward in front of you until your forearms cross. This represents the full and complete range of motion for your chest muscles.

We’ll just skip the rest of the anatomy lesson and get to what you really need to know. For your training, your pecs are essentially trained as a whole using exercises like the bench press, or you can use exercises that focus on your upper chest such as the incline bench press.

Aside from the upper chest exercises, there isn’t really as much specialization for the chest as one might think. Let’s take a look at the different chest specialization areas you might have heard of.

General Pecs: You will train your chest muscle group as a whole using the flat level bench. This includes the flat bench press, flat bench flyes, dumbbell bench press, etc. Dips will also train your pecs with somewhat less emphasis on the upper chest.


  • Upper Chest: You train the upper portion of your chest using an incline bench. Exercises such as the incline bench press, incline flyes, and incline dumbbell bench press will all emphasize the upper chest.
  • Lower Chest: The lower chest muscle is a myth. It’s simply not there. The decline bench press will work your chest from a different angle, yes. But there is no such thing as a lower chest muscle that is distinct or separate from other chest muscles.

  • Inner/ Outer Chest Muscles: Again, there’s no such thing as focusing on your inner or outer chest muscles. Many people believe that flat bench flyes will work your outer chest while the peck deck flyes work your inner chest. This is more of an illusion that comes from the fact that each exercise places greater stress on your chest at different points in the range of motion.
The whole idea of working the inner/outer chest is flawed because it assumes that you can flex one end of a strand of muscle and not the other end. When you muscles contract, the whole entire muscle contracts, not just one end or the other. You cannot contract the bottom of your bicep without the entire bicep muscle getting shorter. It’s just not possible.
There are generally two main types of movements that work your chest muscles:

Pressing Movements: These include the bench press, incline bench press, and all of their variations and different angles. Dips are also included in the category. Pressing movements tend to directly involve the pecs, triceps, and deltoids in the movement. Secondary stabilizer muscles include your lats, posterior delts, and other back muscles.

Leverage Movements: This means chest flyes. Flyes can be done using dumbbells on a flat bench, using a peck deck machine, or using the crossover cables. Flyes are an isolation exercise. Do your pressing movements first in your workout, and add in flyes only when you’ve progressed to the point where you’re ready for more.

A training program that uses a flat bench pressing movement, an incline movement, and some dips will fulfill your chest training needs for quite a while. Stick to these basic movements before you get too carried away doing cable crossovers or other flye movements.

And of course, I know I probably don’t need to keep saying this to you, but don’t get too carried away with working only your chest and your arms. If you want to be a bodybuilder, train your whole body. Don’t be a boobie-builder.

Focusing only on your chest and arms is bad for your body’s balance and posture. Paying attention to building a strong back will balance you out and even give you greater stabilizing muscles that will increase your bench press and strengthen your pecs even more.

miércoles, 27 de abril de 2016

5 MOST EFFECTIVE EXERCISES FOR BUILDING YOUR BICEPS


Here’s the thing: When it comes to biceps training, you can pretty much only do one thing – curl. Boring, yes, but you still desire a nice set of guns.

Maybe you need to get more out of your biceps training. Maybe you need a few more tricks and techniques to get arm growth going again.

The 5 biceps exercises listed below are some of the most effective arm-builders around. At first glance these aren’t anything new, but let’s delve a little deeper and get creative to make these 5 traditional moves into some serious muscle gain-makers.
Try a few of these on for size (literally) and bigger guns will only be a curl away!


1. BARBELL CURL
It doesn’t get more basic than the barbell curl. Heavy, simple and to the point the barbell curl allows you to place the most amount of stress of all the biceps exercises.
Including some form of the barbell curl (be it standing, on the preacher bench, with a wide or narrow grip) is a necessity for anyone’s arsenal if bigger biceps is the goal.
The Twist: A simple yet highly effective version of the traditional barbell curl is the seated barbell curl. Yes, the shortened range of motion will have the illusion of seeming easier to perform, but the reality is quite the opposite. Sit straight up on the end of a bench with the barbell in your lap.
With an underhand grip curl up the weight toward your shoulders and lower under control. When the bar nears your legs only tap the bar and reverse direction. You will find you can lift more weight than the standing, full-range version but that’s not a green light to cheat the weight up. Always use proper, controlled technique.

2. INVERTED RACK CURL

A highly effective but little known biceps builder is the rack curl. If traditional curling has you bored out of your mind and you want to try something very different and a little more functional then give this a try.

Position yourself under a bar (either a locked Smith machine or a bar placed low on a squat rack) and grasp the bar with an underhand grip with your body straight, facing up and feet on the floor. You should be in a similar positon as a reverse-grip inverted row. Keeping your body straight, curl your body up to your hands while flexing your biceps hard.

Your abs, back, shoulders and legs will be under tension for support, but be sure the majority of the stress is to your biceps.

The Twist: After you’ve mastered the move from a moderate height with the bar it’s time to make things a little interesting. Try performing a rack curl ladder. Start with the bar in a low position (the most difficult) and perform your reps as normal. Once you reach failure, raise the bar to the next setting and perform more reps.
Continue to raise the bar to each new level after you reach muscular failure. Each new height will make the exercise angle a bit easier enabling you to keep working your fatigued biceps.

3. DUMBBELL CURL

The dumbbell curl is considered the barbell curl’s little brother, however, utilizing dumbbells allows you to supinate (rotate) the wrist.

Why is this worth mentioning? Because the biceps has two functions: To raise the arm and to rotate the forearm. This supinating action will ensure you are working both biceps heads and getting a complete, thorough workout.

The Twist: Instead of slogging through the normal cadence of “curl the left arm, then the right, then the left and so on” try completing half of your reps for one side then half for the other, then complete your reps in the same fashion.
This small, seemingly insignificant shift will enable you to better focus on the side being worked while reducing upper body sway and swing.
4. INCLINE DUMBBELL CURL

Piggybacking off of the dumbbell curl supinating advantage, the incline bench dumbbell curl is unlike any other exercise for the biceps.Not only will it force you to perform your reps in a strict manner it will also work the biceps in such a way as to increase that coveted peak you are looking to build.

Since this exercise puts you in a vulnerable position it is advisable to use light to moderate amounts of weight and focus on form and technique.

The Twist: Of course using proper form is paramount such as keeping not only your back against the bench but your shoulders as well. Also, let your arms hang down straight to the floor without swinging the dumbbells.
An intense little trick you can try is to lower the weight to a dead stop and pronate (twist) your wrists inward at the bottom of the movement. Twist them back to the supinated (curl) position and lift for your next rep. This will cause an intense stretch and burn. Again, use a lighter weight for these since the drastic stretch will call for more control.

5. REVERSE-GRIP BICEPS CHIN-UP

Another unsung hero of the biceps building world is the reverse-grip chin-up. Normally you would perform a traditional chin-up by pulling with your lats and elbows while arching and squeezing your back.

For the biceps version you will actually slightly round your back to engage your biceps more fully. Also, try more of a curling motion with your forearms instead of a straight pull as in a traditional chin-up.

The Twist: Can’t do too many chin-ups or none at all? You have options. Either have your training partner support your feet to lessen the amount of body weight lifted or loop a band under your feet or knees for the same support.
Another option would be to use a low-hanging bar and jump to the top/contracted position. Once in that position slowly lower your body under complete control for an intense negative (eccentric) fatigue affect. Once you build your strength you will be able to perform normal reps over time.
2 EFFECTIVE PROGRAMS FOR BUILDING YOUR BICEPS:

Try each program once per week. For example, program A on Monday and program B on Thursday.

PROGRAM 1

ExerciseSetsReps
Seated Barbell Curl310-12
Incline Dumbbell Curl (with a full wrist twist)310-12
Seated Dumbbell Curl (one arm at a time)38-10

PROGRAM 2

ExerciseSetsReps
Reverse-Grip Biceps Chin-Up3Max
Inverted Rack Curl Ladder2-3Max
Traditional Seated Dumbbell Curl310-12